Menu Image Student
The Menu Image Student is a simplified version of the Menu with Image plugin. It displays a header image at the top of a list of navigational options.

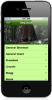
iOS

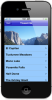
Android
Screenshots

More Information
The Menu Image Student is a simplified version of the Menu with Image plugin. It displays a header image at the top of a list of navigational options.
INSTRUCTIONS
This plugin is designed for users new to the Buzztouch platform and is intended to make it easier to make your first iOS or Android app. It is a simplified version of the Menu with Image plugin.
The Menu Image Student employs a frequently used smartphone format. It displays a header image at the top of the screen with a list of navigational options in rows below the header image. You can also set a background color and a backgroun image.
When the user clicks on a row in the list they are brought to another app screen. When you enter a Menu Row on this control panel, you designate the title text on the row and also what screen your user will see when the row is selected.
Preparing your images
1. PNG Images. Use PNG images in your apps. JPG images will not work on Android.
2. Image Names. Use names with all lower case. Do not use any special characters or spaces in your image names, except for the underscore (_). This is very important for Android development. Your image names should look like this: my_cool_image.png or mycoolimage.png. The following image names will cause your Android app to crash: MyCoolImage.png or my-cool-image.png. If you are doing iOS development, consider using this same strict format, because in the future you may want to use this same Buzztouch project for an Android app.
3. Image Size. You may also want to consider using a program to minimize the size of your images, like TinyPNG.com, in order to improve app performance, especially for Android.
4. Files or URLs. There are two ways to include an the header image in the project. You can either put in the header image file into the project, or you can have the header image on a url that the app will access. It is best to put your header image file into the project to improve the user experience. Including the header image in the project assures that the user will see the image right away and not have to wait for it to download.
Using an image file name: If you choose to use an Image File Name (and not a URL), you'll need to add the image to the Xcode or Eclipse project after you download the code for your app. In Xcode, drag the image to the BT_Images file. In Eclipse, drag the image to res -> drawable folder. To improve performance on newer Android devices, also put your images into the drawable-hdpi, drawable-xhdpi and drawable-xxhdpi folders.
Using a URL: If you use a URL (and not an Image File Name), the image will be downloaded from the URL then stored on the device for offline use. The Image URL must end with the name of the image file itself. For images on a URL, Android requires that the image names follow all the same naming requirements as when the image file is in the project.
Settings in the control panel:
1. Add rows to the menu list: Adding a row to the menu adds a new screen or action to
your project. The Row Title is what will display in the title of the row. Choose a
unique nickname for the screen. As an alternative, with this plugin you can pull menu
items from a remote file using the Screen Data URL. After you add a row, you can add
an icon and a row description.
2. Screen nickname: This field will already be populated, but can be changed in the
event that you receive a warning that two screens have the same name.
3. Top Navigation Bar: Use this to change the default settings.
4. Screen Background Color: Select a background color for your screen. You can
enter "clear" for transparent color, "stripes" for the native iOS effect, or a
hexadecimal number. (Do not use the quotes around your entry.)
5. Screen Background Image: Enter your image file name OR the image URL. In addition,
you can choose the scale and position of the image.
6. Header Image: Enter your image file name OR the image URL.
7. List Layout and Color: Modify the default row background color, font title
color, row select color, and row separator color. You can also override the default
list style of square corners with rounded corners, and override the default that
allows for scrolling of the list.
8. List Row Height and Font Size: Modify the default sizes for the row height,
title height, title font size, description font size, list header height, and list
footer height.
INSTRUCTIONS FOR iOS PROJECT
------------------------
*Drag your image into the BT_Images file in your Xcode project.
The files you need for this plugin are automatically included in the project
package you download from the Download Source Code screen in your control panel.
The files are in the folder named, "wb_menuImageStudent", and include the
WB_smenuImageStudent.h, WB_menuImagestudent.m, WB_cell_menuList.h, and WB_cell_menuList.m files.
INSTRUCTIONS FOR ANDROID PROJECT
------------------------
*Drag your image into the res -> drawable file in your Android project.
The files you need for this plugin are automatically included in the project package
you download from the Download Source Code screen in your control panel. There
are three files for this plugin:
1) in scr -> com.YOUR_PROJECT_NAME, you will find the file: WB_menuImageStudent.java
2) in res -> layout, you will find the file: wb_screen_menuimage.xml, wb_screen_menuheader.xml and wb_screen_menuimage_row.xml
Note: On some Android devices, the background turns black while scrolling. This problem can be avoided by setting a row background color.
JSON Data
------------------------
If you manually enter the menu item data, the JSON data for this item in the BT_config.txt
includes a child items array holding individual BT_menuItem items. Each item produces a row.
"BT_screens":
{
"itemId":"1111",
"itemType":"Menu_with_image",
"itemNickname":"Home Screen",
"navBarTitleText":"Home Screen",
"navBarBackgroundColor":"#330066",
"navBarStyle":"solid",
"navBarRightButtonType":"infoLight",
"navBarRightButtonTapLoadScreenNickname":"Rabbits",
"navBarRightButtonTapLoadScreenItemId":"3333",
"navBarRightButtonTapTransitionType":"fade",
"imageFileName": "my_picture.png",
"listRowBackgroundColor":"#9900FF",
"listTitleFontColor":"#660000",
"listDescriptionFontColor":"#003300",
"listRowSeparatorColor":"#FFFF00",
"listStyle":"round",
"preventAllScrolling":"0",
"listRowSelectionStyle":"gray",
"listRowHeightSmallDevice":"80",
"listTitleHeightSmallDevice":"35",
"listTitleFontSizeSmallDevice":"20",
"listDescriptionFontSizeSmallDevice":"12",
"listRowHeightLargeDevice":"70",
"listTitleHeightLargeDevice":"35",
"listTitleFontSizeLargeDevice":"22",
"listDescriptionFontSizeLargeDevice":"16",
"backgroundColor":"#CCCC00",
"childItems":[
{
"itemId":"menu_1",
"itemType":"BT_menuItem",
"titleText":"This is row 1",
"loadScreenWithItemId":"1234"
},
{
"itemId":"menu_2",
"itemType":"BT_menuItem",
"titleText":"This is row two",
"loadScreenWithItemId":"5678"
}
]
}